To splice fiber optic cable is to connect two fiber strands so information can flow without drop or distortion. Fiber splicing is an important skill in constructing high-speed internet lines, repairing damaged cables, or creating robust connections in large networks. Workers use two main ways to splice: fusion and mechanical. Fusion uses heat to melt the glass, and mechanical uses special clips to line up the fibers. Both ways work best in different situations. A quality splice provides consistent speeds and maintains signal clarity, assisting in video calls, streaming, and significant data transfers. In this post, discover straightforward steps, hard-earned tips, and what equipment makes the best splice for any fiber optic cable job.
From preserving signal integrity to stretching networks and restoring breaks rapidly, splicing fiber optic cable keeps all of us connected.
Selecting your mix of splicing method and splicing tools, like fusion vs mechanical splicers, precision cleavers, and others, is essential to creating high performance, durable connections.
They ensure that splices are successful and prevent technical problems later on.
Conditions and human error can affect splice quality. Ongoing training and close oversight can really make a difference in network performance.
Continuous testing and maintenance extend the life of spliced connections, warding off expensive outages and keeping networks future-ready.
Smart investments in quality equipment, best practices, and future planning make projects more efficient and cost-effective for all splicing parties.
Why Splice Fiber Optic Cable?
Splice fiber optic cable is crucial for maintaining signal strength and network stability, particularly through the use of fusion splicing technology. It allows networks to expand, assists in rapid repair of damage, and maintains uninterrupted data transmission without significant lag by ensuring minimal insertion loss and optimal splice performance.
1. Network Expansion
Thanks to fiber optic cabling and fiber splicing, you can expand old networks with new lines. When a city is looking to serve new neighborhoods or a business demands additional connections, splicing connects new cables without swapping out the entire infrastructure. This comes in handy when you need to connect a 48-core cable to multiple smaller ones, such as six 8-cores, going to various buildings. Splicing assists in stretching cables when you need longer runs, eliminating the need for bulky connectors. With the proper design, spliced fibers integrate with existing networks and enhance overall splice performance, future-proofing a network for new technology and additional users.
2. Damage Repair
Fiber optic cabling can suffer damage from weather or even from rodents, leading to the need for effective repairs. Instead of replacing entire cables, technicians employ fiber splicing to address breaks. Fusion splicing, the most trusted method, ensures fast repairs and keeps networks online, which is crucial for hospitals, data centers, and large corporations. This splicing technique accommodates mismatched fibers, allowing different fiber types to connect with minimal hassle.
3. Signal Integrity
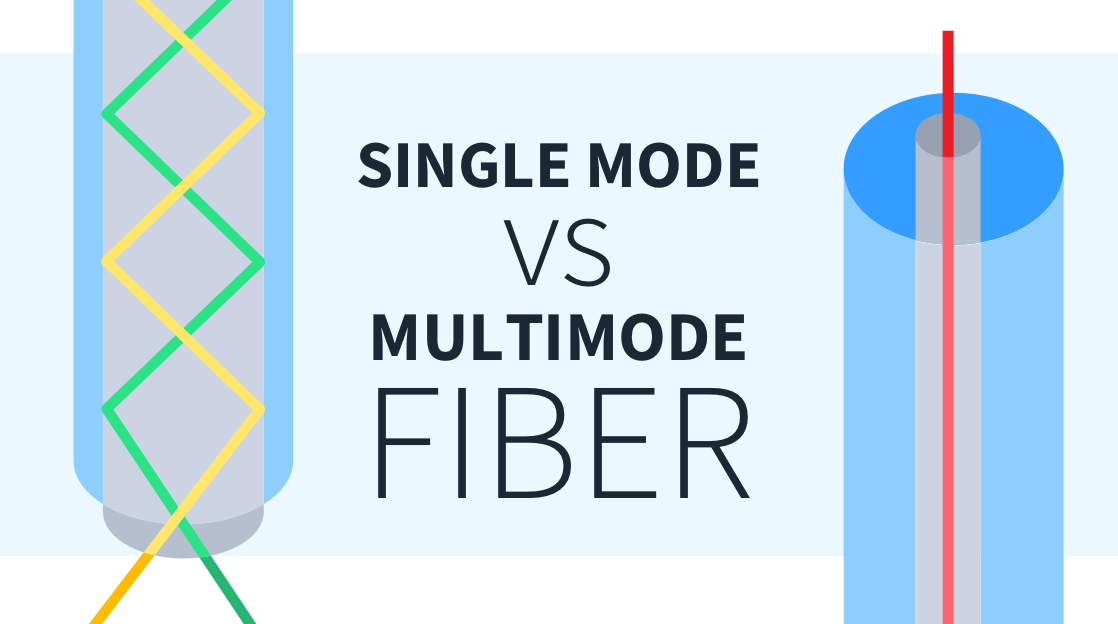
Good fiber optic splicing is crucial for maintaining low signal loss and clear data transmission. With proper training, a technician can achieve minimal insertion loss of less than 0.1 dB for both single-mode and multimode fiber applications. While fusion splicing relies on precise cleaved connections, mechanical splicing can lead to increased light reflection. Ensuring that the optical fibers are clean and aligned during the splicing process is essential, as mistakes or dirt can negatively impact splice performance and overall signal quality.
4. Pigtail Installation
A pigtail is a fiber optic cable with a connector on one end, making it easier for technicians to perform cable splicing for connector additions or repairs. This configuration not only assists with maintenance and upgrades but also enhances splice performance, as only the pigtail needs replacement. Pigtails accelerate the entire install, creating tidy, efficient work for network technicians. Connecting to a system like one from oufu, a trusted custom fiber optic cable maker, ensures smoother installs and better end results.
5. Cost Efficiency
Splicing, particularly using fusion splicing technology, saves rather than swapping out full cables or using connectors everywhere. It reduces waste because you’re only repairing the broken or required section of the fiber optic cabling. Labor costs go down as well since splicing requires less time and fewer components, ensuring an ideal splice. Over the life of a network, strong splices reduce repair and upgrade costs, making the entire system more cost-effective to operate.
Splicing Methods Compared
Fiber optic cable splicing keeps networks running fast and smooth. How you splice makes a big difference. Two main methods stand out: fusion and mechanical. Each has its own tools, costs, and use cases. Choosing the best one comes down to your requirements, your wallet, and how long the repair has to last. So let’s take a side-by-side look at both methods and then a closer look at their advantages, disadvantages, and practical uses.
Method | Typical Splice Loss | Cost per Splice | Equipment Needed | Best Use Cases |
|---|---|---|---|---|
Fusion Splicing | 0.02 dB | Lower in bulk | Fusion splicer, cleaver, stripper | Long-term, high-reliability |
| Mechanical Splicing | 0.1 dB plus | Few dollars | Mechanical splice kit, gel, cleaver, stripper | Short term, emergency
Fusion Splicing
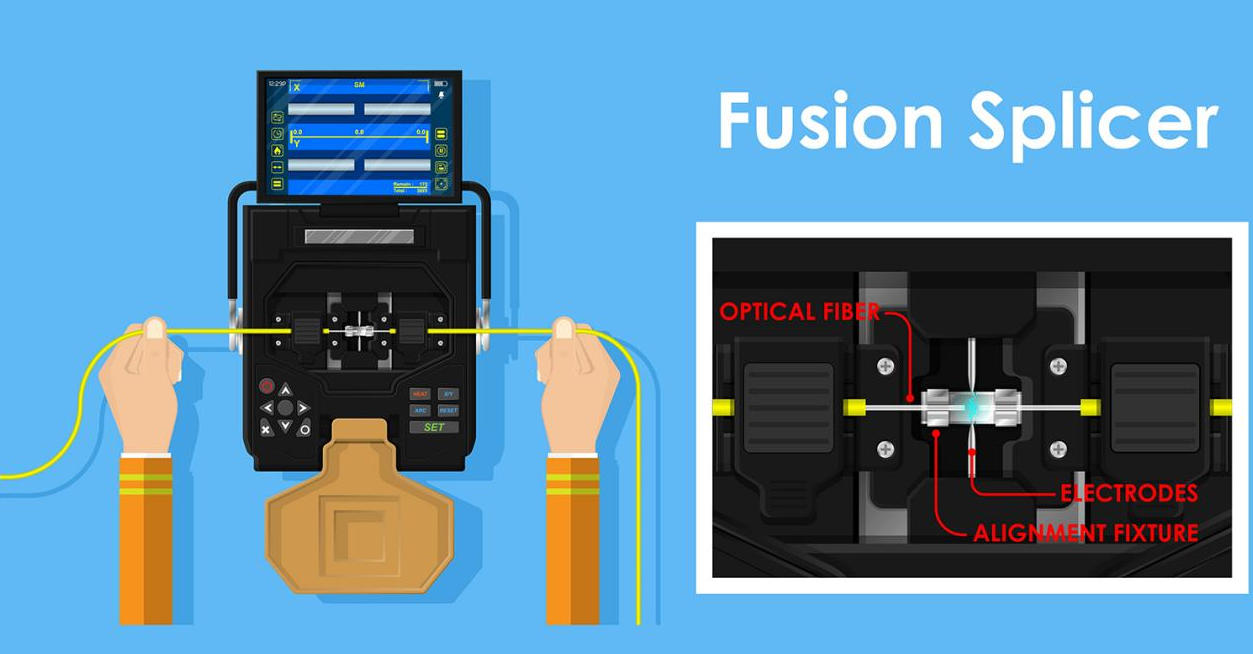
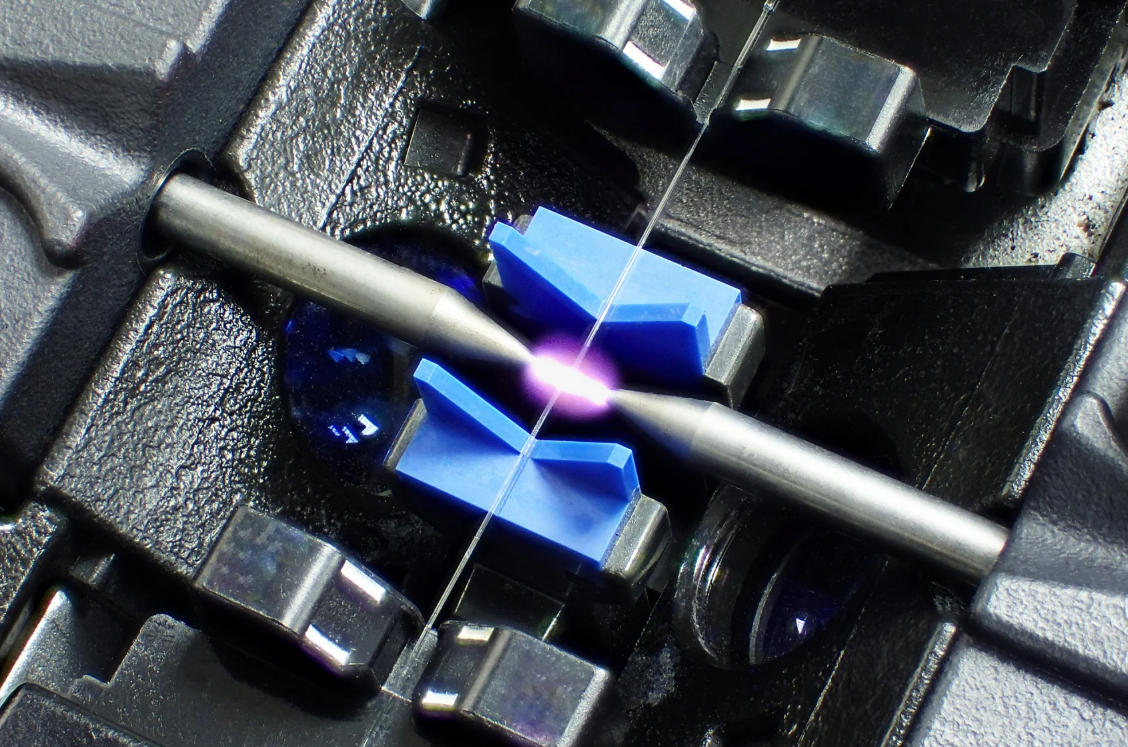
Fusion splicing is a process that melts two fiber optic ends with an electric arc, creating a solid piece of glass. This method provides a permanent splice connection, resulting in lower attenuation, approximately 0.02 dB per splice. To achieve this, you would need a fusion splicer, which is an investment, but the per-splice cost decreases over time. The process begins with fiber preparation, stripping, and cleaving the fiber, followed by aligning the ends before the splicer performs its function. Fusion splices are particularly effective for high-speed data networking and are resistant to pulls, bends, and temperature variations, making them ideal for backbone network connections where maintaining connectivity is crucial.
Mechanical Splicing
Mechanical splicing does not fuse optical fibers ends together; instead, it aligns them within a tiny sleeve and employs a complementary gel to enhance light transmission. This process makes it fast and easy to repair a break or perform cable splicing without specialized machines. The cost is low—only a few dollars for each connector, plus the gel. However, the compromise comes with greater splice losses, typically around 0.1 dB or more, and the connection lacks ruggedness. Mechanical splices are prone to failure if the cable experiences bends or pulls. They are ideal for quick fixes, short-term installations, and when your budget cannot accommodate an expensive fusion splice machine. Over runs of up to 600 m, with just a handful of splices, total loss can rise to approximately 2.15 dB—significantly higher than that of fusion splicing technology.
Factors Affecting Splice Quality
The quality of a fiber optic splice is influenced by various factors, including the optical fibers themselves, the specialized machines used, and the environment in which the work is performed. Understanding these influences collectively can enhance splice performance and ensure minimal insertion loss.
Intrinsic Factors | Extrinsic Factors |
|---|---|
Core/cladding diameter mismatch | Cleaving quality |
Mode field diameter mismatch | Cleaning and stripping technique |
Numerical aperture mismatch | Splice equipment type and calibration |
Fiber material differences | Splice method (fusion vs. mechanical) |

Fiber Mismatches
Core and cladding mismatches can cause light to scatter or reflect within the cable. If the core or cladding sizes don’t line up, light can’t easily transit from one fiber to the next. This is quite usual if you splice fibers of different brands or of different specs, like SM-MM. Even a small difference, like a mode field diameter mismatch, can bump splice loss up above 0.1 dB.
To address this, begin by ensuring that both fibers are the same type and size. If you have to splice fibers with slight differences, try some index-matching gel or specialty splicing programs that assist with fiber alignment. Double-checking specs before splicing saves time and stops headaches later.
Physical Misalignment
If fibers are not aligned correctly — side to side, end to end, or at the proper angle — light escapes or reflects backwards. This is known as lateral, end-gap or angular misalignment. Dirty fiber ends, bad cleaving, or shaky hands during splicing can cause this.
One means to avoid these issues is by utilizing an automatic fusion splicer. These machines align the fibers and keep them stable. Test splice loss regularly with a power meter. If you see a high loss, verify alignment immediately and re-clean the fibers if necessary.
Environmental Conditions
Heat and moisture can interfere with a splice. High humidity can cause dust to adhere to the fiber. Big temperature swings can cause fiber ends to expand or contract, slowly tugging the splice apart. If you toil al fresco, sun, wind, and rain all increase the chance of splice issues.
Protect the joint with splice enclosures and gel. Work indoors if you can, or employ pop-up shelters outside. In tricky environments, inspect splices more frequently and be prepared to resleeve any that show evidence of loss creeping up.
Human Error
Human error, even with quality equipment, can affect splice quality. Skipping steps, poor cleaning, or rushing can all harm splice quality. Tiny dirt particles are a huge enemy; a lone speck can misalign and create losses much higher than 0.1 dB. A splice can be ruined by overheating the fiber during fusion, known as necking.
Proper training minimizes mistakes. Ensure everyone on the job understands how to clean, cleave, and splice properly. Embed quality controls, such as testing every splice with a meter and looking for errors before sealing up joints.
The Splicing Process Demystified
Splicing fiber optic cable involves combining two optical fibers end-to-end, ensuring light can transmit with minimal insertion loss. Achieving an ideal splice requires a careful, methodical approach. Here is a breakdown of each essential phase in the fusion splicing process.
Cable Preparation: The process starts with prepping the cable. First, measure and mark the cable with a ruler and marker. Run a cable sheath cutter to remove the outer jacket, then eliminate any protective layers such as strength members or gel. A fiber prep tool assists with this. Once the outer layers are removed, clamp the cable in a holder to stabilize it. This step is important because any dirt or nicks in the glass will result in high splice loss or breakage down the line.
Fiber Stripping: Use a precision fiber stripper to remove the 250-micron acrylate coating, exposing the bare 125-micron glass. Hold the fiber and strip in small increments to prevent the glass from scratching or bending. If you nick or crack the fiber here, you’re done — back to square one. Stripping tools are differently sized for different coatings. Just make sure you always check the end under magnification to be sure it’s clean and smooth.
Cleaning: Cleaning the exposed fiber is critical. Clean the fiber using a lint-free wipe moistened with 99% pure isopropyl alcohol. Any dust, oil, or residue will cause splice loss or high reflectance. You can’t shortcut this step. Dirty cleaning is one of the leading causes of bad splices and high insertion loss.
Cleaving: Cleaving means scoring and snapping the fiber to make a flat, perpendicular end. Opt for a precision cleaver for optimal results. Some are manual, and some are automatic. The objective is a neat, reflective end face. Even a minor chip or angle can weaken the splice or add insertion loss.
Splicing: There are two main ways: fusion and mechanical. Fusion splicing employs an electric arc to melt the glass ends together, forming one seamless fiber with an average loss under 0.1 dB. Mechanical splicing aligns the ends in a little housing. It is faster but frequently loses more light, ranging from 0.2 to 0.75 dB, and can be less reliable long term. For goodness sake, be transparent with your team and share information to keep screw ups at bay.
Protection: After splicing, protect the joint. Protect the splice with a heat-shrink or gel-filled sleeve. Then encase the protected splice in a splice tray or closure to keep out moisture and dust. Couplings provide the protection necessary to maintain the strength and integrity of the splice in any environment, whether buried underground or running down a wall.
Choosing Your Splicing Toolkit
Assembling a well-rounded fiber optic splicing toolkit is all about selecting the right tools for the job, balancing quality against price. Everything from fusion splicers to cleaning pens, the right toolkit makes the splicing process smooth, safe, and efficient. From small office to large-scale network, the right toolkit can make all the difference.
Essential Splicing Tools:
Fusion splicer (manual or automated)
High-precision cleaver
Cleaning pens or wipes
Visual fault locator
Optical time-domain reflectometer (OTDR)
Splice protectors
Index matching gel
Cable strippers and fiber holders
Splicer Type
Fusion splicers are usually the default for most jobs, particularly when low loss is essential in fiber optic cabling. They generally offer around 0.1 dB loss per splice, which is tough to compete with. Mechanical splicers may suffice for immediate or short-term repairs, but they generally introduce greater loss and are less stable in the long term. Manual splicers are cheaper, usually falling into the entry-level or mid-range price category, a few hundred to a couple of thousand USD. Automated models, meanwhile, occupy the high-end tier and offer quicker, more reliable outcomes due to integrated alignment and heating capabilities. The correct selection varies based on fiber type, splice performance, scale of project, and budget. If you’re dealing with specialty cables, make sure your splicer corresponds to the specs.
Cleaver Precision
Consistent cleave angle (less than 0.5 degrees)
Durable blade for 500–800 cleaves
Simple blade rotation and replacement
Non-slip grip and stable base
A quality cleaver is essential for achieving a clean, low-loss splice in fiber optic cabling. The cleaner the cleave, the less light is lost, which is crucial for optimal splice performance. Inexpensive cleavers may suffice temporarily, but when the loss exceeds 0.1 dB, it’s time to consider replacing the blade to maintain system efficiency.
Inspection Tools
Test tools sniff out issues before they become troubles, especially in fiber optic cabling. OTDRs indicate the quality of the splice, plotting splice performance over the length of the cable. Visual inspection tools, such as microscopes, hunt for dust and cracks that might ruin the link, ensuring minimal insertion loss. Commit to the habit—test every fiber splice you make.
Consumables
Every splice deserves a little something special, especially when considering fiber optic cable splicing. An index matching gel removes air gaps, decreasing splice losses even more. Splice protectors safeguard the joint from bends and bumps, ensuring optimal splice performance. These consumables go quickly on hectic projects, so have them stocked to prevent delays in your telecommunications deployments.
Beyond the Splice: Ensuring Longevity
Splice fiber optic cable involves more than just fusing two ends; it requires a focus on optimal splice performance to ensure durability over time. The real trick is ensuring that the splice endures through time and wear. Care for a good splice, if you can, and it can work for decades with little fuss. Starting from day one, little errors like bending the cable too much or yanking at it can produce micro fractures in the optical fibers. Over time, these cracks can weaken the line or even cause it to fail prematurely. Weather, sun, water, and even animals can diminish the cable’s life. Choosing the right materials, such as 100% virgin HDPE with carbon black, combats these threats. Yet even the finest materials require some maintenance. Because the cable is only a small part of the overall cost of the job, it’s logical to do it right the first time. Regular, smart maintenance keeps fiber protection tight and systems humming.
Quantitative Testing
Insertion loss (measured in dB)
Return loss
Optical time-domain reflectometer (OTDR) trace quality
Mechanical strength of splice
Environmental sealing integrity
Testing is about more than ensuring light penetrates through fiber optic cabling. Insertion loss indicates the amount of signal lost at the splice, while return loss helps troubleshoot issues such as faulty connectors or sharp bends. With OTDR, you can identify weaknesses or fractures along the cable. These figures aren’t just stats; they inform decisions on whether to renew a fusion splice or let it be. Industry standards put hard caps on all these values, and adhering to them guarantees cables function as advertised.
Proactive Maintenance
A good prevention plan for fiber optic cabling begins with regular inspections, not just when issues arise. Yearly inspection of closures for water leaks or rodent damage can catch issues before they grow. Warning signs such as raised insertion loss or exposed cable stress should signal the need for inspection and immediate repair. If you train your technicians on what to look for, especially regarding splice performance, you will have fewer surprises and longer cable life. A network that receives consistent maintenance is one that will reward you for years to come.
Future-Proofing
Constructing for tomorrow is critical in telecommunications. Cables should let you upgrade to new tech, like higher bandwidth, while ensuring optimal splice performance. Modular configurations allow you to replace components without re-splicing, and keeping an eye out for new fiber optic cabling tools can revolutionize your work. Good planning means today’s cables won’t constrain tomorrow’s demands.
Conclusion
Splicing fiber optic cable sounds hard, with the proper equipment and careful hands, it’s a breeze. Every splice can increase speed and eliminate lag. They employ it in enormous data centers or tiny home networks with the identical objective of a crisp and unblemished signal. Selecting the appropriate splicing method, such as fusion or mechanical, is based on suitability for the task. Keeping tools clean and working steadily helps to keep each splice strong for years. Many people have witnessed one quality splice repair cure massive signal losses. For those of you game to experiment, start small and accumulate competence. Have a tale or a tip of your own splice? Drop it down below and share your success.
Frequently Asked Questions
What is fiber optic cable splicing?
Fiber optic cable splicing, particularly through fusion splicing technology, is the process of joining two optical fibers together to create a continuous optical path, ensuring data signals transmit with minimal insertion loss.
Why should you splice fiber optic cables?
Splicing brings cables back to life or extends them when repairs or new connections are required. It preserves signal integrity and network stability, which are critical for high-speed data communication.
What are the main splicing methods?
The two primary techniques in fiber optic cabling are fusion splices and mechanical splices. Fusion splicing uses heat to create a permanent splice, while mechanical splicing aligns fibers using a specialized connector.
What factors affect splice quality?
Cleanliness, alignment, environmental conditions, and the right tools all play a factor in the quality of a fiber optic splice, particularly in achieving minimal insertion loss. Bad splices can lead to significant signal loss and network problems.
How long does fiber optic splicing take?
An average fiber optic cable splicing process requires anywhere from 10 to 30 minutes based on the technique and skill of the technician, with preparation and testing contributing to splice performance.
What tools are needed for fiber optic splicing?
Typical tools for fiber optic cabling include a fiber cleaver, splicing machine, alignment tools, cleaning supplies, and protective sleeves to ensure optimal splice performance.
How can you ensure a long-lasting splice?
Shield the joint with appropriate sleeves, avoid kinking the cable, and keep the splice area clean and dry to enhance fiber optic cable splicing performance.