To install fiber optic cable, people usually follow a set of steps that include planning the route, laying the cable, and connecting it to the network. Fiber optic cables transmit data quickly and over significant distances, making them an ideal option for internet and communication requirements. We all begin by surveying the land and creating a quick map of where the cable line might run, then digging shallow trenches or utilizing existing ducts. Crews pull the cable into these spaces, careful not to pinch or break the glass fibers inside. Once laid, they splice the ends with unique connectors and test the signal for speed and clarity. In the following sections, the step-by-step specifics will give you a kick start.
Thoughtful route planning and site evaluation prevent signal loss and steer clear of obstacles. This smooths installation for all.
Having the proper tools and safety equipment prepped in advance makes the process streamlined and safe for the installation crews.
Adhering to rigorous safety protocols, such as donning eye protection and correct handling safeguards, helps installers and preserves the fiber optic cables’ longevity.
Periodic testing, documentation, and inspections ensure the fiber optic network stays dependable and simplify future debugging.
Knowing the different fiber optic cables and their handling requirements avoids damage and ensures each cable performs optimally.
Maintaining clean cables, following bend radius guidelines, and logging your installation process will pay dividends for network health and maintainability in the long run.
Pre-Installation Essentials
Installing fiber optic cable, especially during your next fiber optic cable installation project, requires more than simply stringing a line from here to there. Pre-installation planning helps you avoid signal loss and reduce unnecessary expenses, ensuring that your fiber internet installation appointment goes smoothly. Armed with the right tools and a step guide, you can make the rest of the work more graceful.
Route Planning
Locating the ideal cable route isn’t simply about selecting the shortest possible run; it’s about minimizing bends and keeping the fiber optic patch cords as straight as possible to prevent signal loss. Each time a fiber cable is bent too abruptly, the light signal suffers. It’s wise to avoid laying fiber patch cords near copper cables, as they can interfere with the signal quality.
Checking the site for things like underground pipes, water lines or even concrete walls can save you a lot of headaches down the line. For instance, older structures may have random steel beams or ancient wiring lurking behind walls. If you discover these ahead of time, you can plan to go around them instead of backtracking halfway through. Be sure to measure the run properly so you will know how much cable to order. Estimating will either waste cable or fall short.
Mapping out the path you’ve selected and distributing copies to all team members keeps everyone in sync. This map should pinpoint every curve, junction, and interconnector. If you encounter an unforeseen obstacle, such as a new construction zone appearing overnight, having a backup plan ensures you don’t have to halt work for too long. Additionally, remember that permits and local regulations are crucial; neglecting these can lead to fines or mandatory re-routing of your fiber internet installation project.
Tool Checklist
Fiber optic cable and patch cords
Fiber pulling eye kit or pull sock
Fiber cleaner for end faces
Splicing machine and termination kit
Eye protection, gloves, and safety shoes
Cable ties, duct tape, and conduit
Markers and measuring tape
Fiber optic connectors
Trenching tools for underground routes
Permits and documentation
Safety Standards
Fiber optics come with hard safety guidelines. OSHA is no joke. Fiber shards are sharp. Always wear eye protection. Gloves protect your hands, and rugged footwear shields your feet from dropped tools.
You need to be careful with the cables, never pull or bend them too much. Get your crew trained to recognize hazards, from dust on the fiber end face to hanging cables off the floor. Even seconds of air exposure can soil a fiber’s end face, so keep your cleaner close at hand. Fiber splicing and termination require expertise and experience, so keep untrained fingers away.
How to Install Fiber Optic Cable
Installing fiber optic cable, particularly fiber optic patch cords, is a straightforward process that requires patience, accuracy, and quality supplies. These cables are comprised of hundreds of clear glass or plastic strands, as thin as human hair, that transmit data in the form of light. The installation, which can take less than an hour with homes, links the residence to a junction box or ONT, typically located externally. To ensure you’re ready, gather all essential tools: fiber optic cable stripper, cleaver, fusion splicer, cable connectors, and protective gear. Getting your ducks in a row before you begin prevents errors and keeps the process flowing.
1. Cable Preparation
Slice the fiber optic patch cord with a sharp cable cutter and leave a bit of slack on the ends for simple connections. Use a fiber optic cable stripper to strip the outer jacket, being careful not to nick or break the thin fiber strands. Clean each cable end with a fiber optic cleaner before proceeding, which keeps the signal crisp and robust. Before you begin installation, inspect the fiber patch cords for any cracks, kinks, or other damage that may prevent their proper operation.
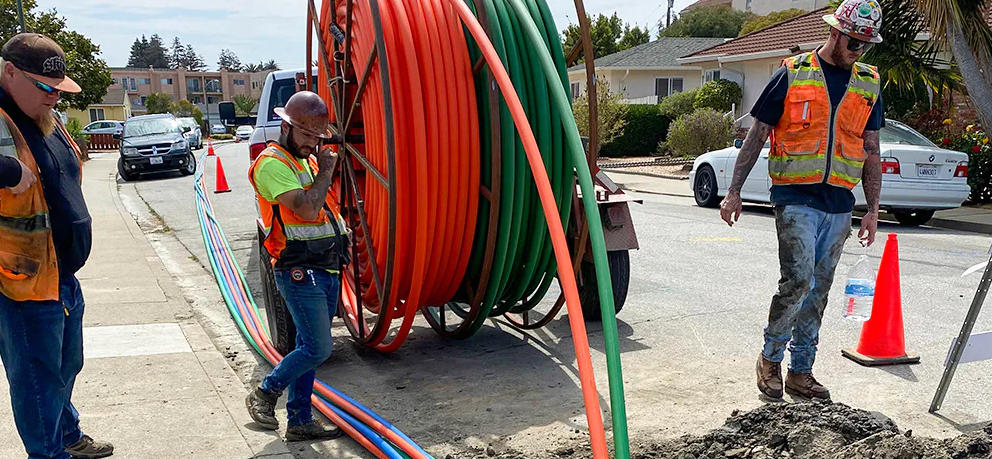
2. Cable Pulling
When pulling the fiber optic patch cord through walls or conduits, nothing beats a pull sock, which gives you a grip on the cable without crushing it. Maintain a constant pull to avoid yanks or tight bends that can break the fibers or induce signal loss. If you sense the cable sticking, add a cable lubricant for easier sliding without damaging the outer jacket. It’s also essential to map your route and ensure you give slack for corners and turns, keeping the fiber internet installation secure and unscathed.
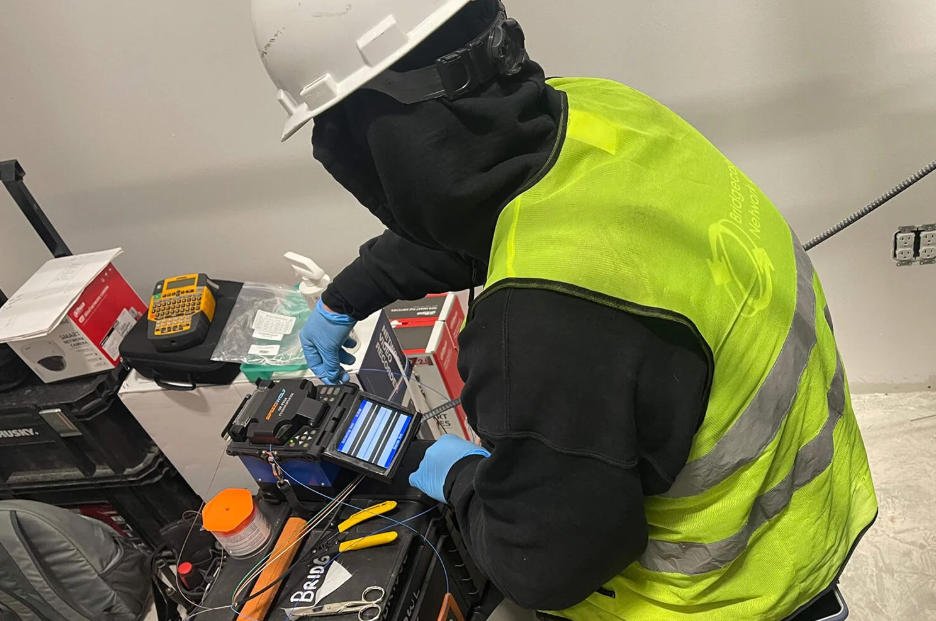
3. Fiber Splicing
When splicing two fiber optic patch cords together, employ a fiber optic cleaver for that perfectly clean slice. Follow the splicer’s handbook and splice them together for a strong, low-loss connection. Test the joint with a light source and power meter. If it drops, redo the splice. Log your splice points and outcomes for subsequent inspections or fixes.
4. Connector Termination
Select the appropriate connector for your specific cable type, single-mode or multi-mode fiber patch cords. Carefully follow the termination steps at both ends, and always test the connector ends with a fiber optic microscope. A clean, smooth end equals a stronger, more stable signal, so secure each connector firmly to prevent it from loosening.
5. Housing & Management
Utilize junction or distribution boxes to maintain fiber optic patch cords secure and organized. Cable managers, both vertical and horizontal, prevent messy tangles in your cable pathways. Label each cable and connector so if you ever do have to repair or upgrade, you know what’s what. Good grounding makes your system safer. If you want high-quality custom cables, companies like oufu offer a wide range for any setup.
Beyond the Physical Connection
The worth of fiber optic patch cords extends way beyond speedy net access. Fiber delivers symmetrical upload and download speeds, frequently up to 5,000 Mbps or higher. This enables users at home and in the office to plug in multiple devices simultaneously without lag, even under heavy load. Its robust, future-proof network makes fiber a smart long-term pick, fueling emerging demand for increased bandwidth for years to come. Regardless of being aerially installed on poles or underground via microtrenching, fiber optic cable’s flexibility benefits diverse environments and climates. Well below the surface, here are fundamental ways to keep fiber networks resilient and scalable today and tomorrow.
Strategy | Signal Integrity | Future-Proofing | Environmental Considerations |
|---|---|---|---|
Maintain Regularly | Routine signal checks | Allow for future upgrades | Weatherproof and shield cables |
Test Performance | Use OTDR and power meters | Research new technologies | Monitor temperature and moisture |
Educate Personnel | Train teams on best practices | Choose modular components | Use UV-protected cables outdoors |
Signal Integrity
Checklist for Maintaining Signal Integrity: * Look at cable runs for bends, kinks, or pinched areas. Any small bends can drop signal.
Ensure connectors are clean and fit well. Dirt or loose ends will make you lose signal.
Record all splice and connector locations for subsequent inspection.
Test fiber quality post installation with OTDR or power meters. Devices detect vulnerabilities immediately.
If you experience signal loss, repair it promptly. Other times, it is something as straightforward as a connector that popped loose or a cable pinched behind a piece of furniture.
Educate all your fiber handlers about common sources of bad signal. A bit of dust, a sharp bend, or a wrong connector are examples.
Future-Proofing
On the edge: Research new fiber optic technology, like bend-insensitive fiber or higher-density cables, to keep up to date. It’s exciting to have a chat with manufacturers about what’s next.
Go into it thinking about the future. Leave room in conduit runs and racks for additional cables. Modular hardware makes upgrades and repairs a breeze.
Think big. If a business or home adds more devices, the network can keep up without a full overhaul.
Environmental Factors
Temperature fluctuations can expand or contract fiber cables, threatening breaks or signal degradation. For outdoor runs, consider cables made for heat and cold.
Wet wrecks fiber. Waterproof jackets and sealed connectors keep you from getting in wet spot trouble.
Sunlight degrades certain cables over time. For outdoor use, choose cables with UV protection.
High traffic areas require additional protection. In hallways or near machinery, use armored or reinforced cables to prevent wear and tear.
Post-Installation Verification
Post-installation verification tests whether the fiber optic patch cords perform as intended and satisfy the required specifications. This practice avoids downtime, prolongs cable life, and maintains low maintenance costs, leading to fewer surprises during the next fiber optic cable installation project.
Inspection Criteria | Testing Methods |
|---|---|
Visual check for damage | Visible laser source |
Connector cleanliness | Fiber identifier (FI) |
Proper termination | Visual fault locator (VFI) |
Documentation review | Optical time-domain reflectometer (OTDR) |
Inspection
Begin with an inspection of the cables. Post-Installation Check. Any nick, kink, or bend can damage the signal, so inspect each for damage or indications the cable was yanked into position. Connectors are just as important. They should feel tight and not exhibit any dust or oil. Small pieces can obstruct light and destroy function. Take a clean cloth or wipes to clear them if necessary.
Pull out the install logs and cross-reference them. Every step from the way cables are routed to how they’re terminated needs to be consistent with the design. More than one set of eyes is helpful. Having a second set of eyes review a post-installation can catch what one person might miss and make the review more thorough and trustworthy.
Testing
Testing ensures your network is speedy and reliable. Shine a visible laser through one end and see whether light comes through the other. If it does, the core is clear. Fiber identifiers enable you to verify the signal at any point along the link, which is useful if you have to locate a break. In more detail, visual fault locators pump light into the fiber and allow you to ignore bends or breaks.
An OTDR is mandatory. It traces the entire cable, indicating precisely where attenuation occurs or where splices are. Regular checks, monthly or quarterly, put you ahead of trouble. Consider the figures from each test. If the loss is too high or the signal drops, flag that location for repair.
Troubleshooting
Post-installation verification. Start simple: check connectors and look for bends or pinches. Follow up with a VFI or OTDR to hunt down the signal pinch point. Record all of your actions. This becomes a reference for the next time something breaks.
Get everyone on the team trained to use these tools. The more people that know the basics of fault finding, the faster problems get resolved. Documentation ensures that if you run into the same hurdle again, you don’t reinvent the wheel.
Handling Different Cable Types
Fiber optic cables, including various fiber optic patch cords, are utilized in many different designs, each tailored for specific network jobs. Proper handling not only keeps these cables in tip-top shape but also ensures that fiber internet networks remain efficient. Installers must know how to maneuver and store fiber patch cords, as well as detect issues before they propagate.
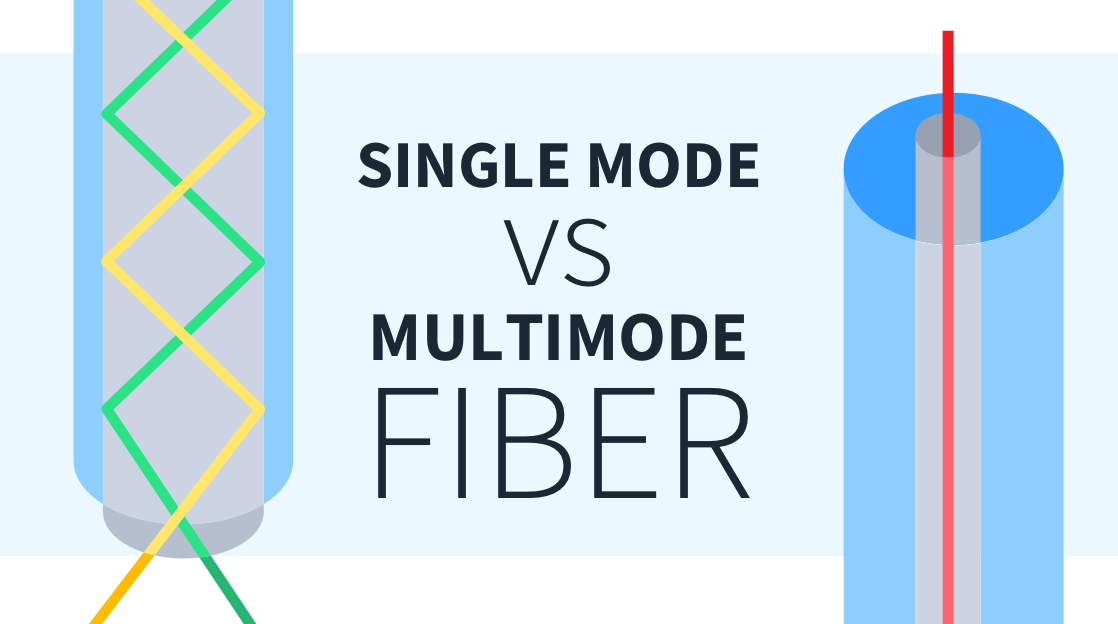
Single mode cables have a narrow core of about 9µm and are built for long distances and high speeds.
Multimode cables have a wider core of 50µm or 62.5µm. They are good for shorter runs and include types OM1, OM2, OM3, OM4, and OM5.
Patch cords are short, flexible, ready-made cables for linking devices.
Bulk distribution fiber is used for linking many points and comes in larger spools.
They each have different bend limits, pull strength, and storage requirements.
Patch Cords
Patch cords are the go-to for short links between network hardware. They’re malleable and fast to deploy. They’re most effective for interconnecting switches, panels or devices in close proximity, in racks or cabinets. Patch cords are jostled a lot and can get pinched or tangled if not treated gently.
PACKAGING DIFFERENT CABLE TYPES
Easy patch cord storage: Loop your patch cords loose and store them away from heavy equipment. Avoid sharp bends. When patch cords get kinked, their performance plummets. Employ cable trays or hooks to remove cords from the floor and sharp edges.
Verify patch cords with a tester every now and then. This assists in detecting any damage early, before it impedes data transmission. Label each end, so you don’t have to guess during troubleshooting. This saves time and reduces errors, particularly when multiple cords lie adjacent to one another.
Distribution Fiber
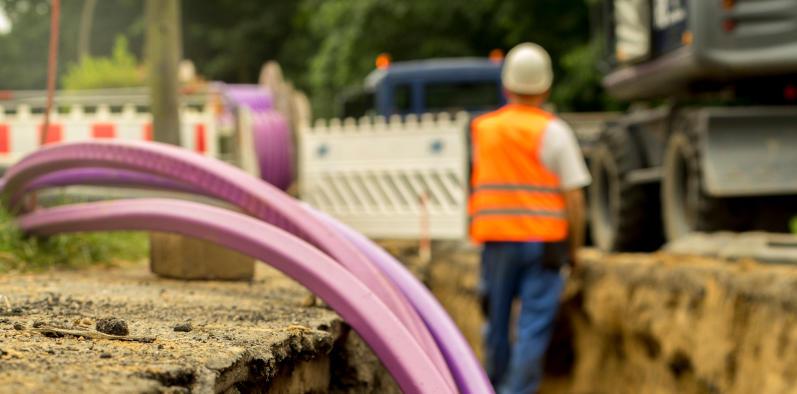
Distribution fiber links connect multiple locations, typically spanning rooms or buildings, using fiber optic patch cords. These connections are less flexible than patch cords and are usually drawn through conduits or underground. As with all cables, it is essential to heed the manufacturer’s recommendations regarding bend radius, burial depth, and pulling force to ensure optimal performance.
Good practice involves mapping cable routes and avoiding sharp turns and excessive bends. When pulling fiber optic cable through tight spaces, technicians should be cautious of crushing, as it can lead to a performance drop if the cable is squeezed or bent too much. Distance limits are crucial: OM2 works up to 80 meters, OM3 extends to 300 meters, and OM4 can reach up to 400 meters at 10 Gbps, which is vital for fiber internet installations.
Educate crews on the distinction between single mode and multimode fibers, emphasizing the importance of not mixing OM2, OM3, OM4, and OM5 variants. Each type has its own speed, distance, and light wavelength of 850 nanometers or 1300 nanometers. Intermixing types can induce errors and drag, impacting the overall integrity of the fiber optic patch cord installation.
Installation Best Practices
Thoughtfulness in installation techniques and careful planning are essential for fiber optic patch cord installation. Best practices ensure strong signals and a problem-free system. A skilled crew, thorough documentation, and respect for cable limits contribute to a secure and sustainable fiber internet install.
ALWAYS ROLL THE FIBER OFF THE SPOOL, NEVER SPIN IT OFF THE END! Spinning twists and stresses the cable, causing damage that might not manifest until later.
Use a minimum crew of three: one at the pulling equipment, one at the supply reel, and one coordinating and communicating along the path. This keeps the process fluid and prevents errors.
Shoot for one pull whenever you can. Every pull or stop adds tension and risks jacket stretching, which stretches and weakens fibers and eventually causes burnout.
Familiarize yourself with the cable’s strength member, which is typically Kevlar aramid yarn or a fiberglass rod. These permit 45 to 90 kilograms of pull strength, but going beyond this can inflict unseen damage.
Have open communication between the entire team throughout the installation. A small misunderstanding can be expensive.
Record every step. Information such as cable type, pull length, and any problems encountered creates a template for future servicing.
Maintain Cleanliness
Dust, oil, or little bits of debris can destroy the performance of a fiber optic patch cord. Lint-free wipes and isopropyl alcohol are best for cleaning connectors and cable ends prior to joining. Teams should use gloves and not touch fiber surfaces. With installation best practices, training everyone on the crew gets each one to honor these habits, safeguarding the signal’s purity and ensuring effective fiber internet performance.
Respect Bend Radius
All cables, including fiber optic patch cords, have a manufacturer’s minimum bend radius. For instance, older OS1 or OM1 glass generally requires 30 mm or more. Not adhering to this can cause micro-cracks that weaken signals or even break them. Cable trays, loops, and ties should lead cables smoothly around corners, ensuring optimal performance for fiber internet connections. Bosses should check work often, intercepting any tight bends early before they cause issues.
Document Everything
Keep detailed records of cable lengths, connector types, installation dates, and routes for your fiber optic patch cords. Record any hiccups, like stuck cables or sudden tension, and note solutions. A well-organized system, whether digital or paper, will save you time during troubleshooting or when planning your next fiber optic cable installation project.
Conclusion
Fiber optic cable installation can sound difficult, with clear steps it becomes manageable. Every step, from design to final tests, requires attention, quality equipment, and a sure touch. Most people encounter minor hurdles, such as managing tight curves or troubleshooting weak connections. These hiccups can drag things down, but patience is worth it. Picture that blazing-fast, blazing-wide net speed that awaits at the end. Be sure to check each link, repair faults, and keep things organized. Whether in large houses, compact apartments, or bustling construction yards, a reliable fiber installation delivers powerful, seamless internet to everyone. For more or if you get stuck, connect or trade tales with other fiber wizards. Your good net begins here.
Frequently Asked Questions
What basic tools are needed to install fiber optic cable?
For your next fiber optic cable installation project, you will need a fiber optic cable, cable cutters, strippers, a cleaver, connectors, and a fusion splicer.
How deep should fiber optic cables be buried?
For outdoor installations, burying fiber optic patch cords at a minimum depth of 60 centimeters is crucial.
Can I install fiber optic cable myself?
Sure, you’re experienced and equipped, but we strongly suggest professional installation for optimal outcome and safety, particularly for essential fiber optic patch cord connections.
How do I verify a successful fiber optic installation?
Test the connection using an optical time-domain reflectometer (OTDR) or power meter, ensuring low attenuation and no breaks in the fiber optic patch cords.
What is the difference between single-mode and multi-mode fiber optic cables?
Single-mode cables, often used in fiber internet applications, transmit data over long distances with a single light path, while multi-mode fiber patch cords are ideal for shorter distances utilizing multiple light paths.
Why is proper cable handling important during installation?
Proper handling of fiber optic patch cords is essential to prevent damage to the cable’s core, which can lead to signal loss or breaks. Avoid bending, twisting, or pulling the fiber optic cable too tight.
What are the key safety precautions when installing fiber optic cables?
Wear safety glasses, exercise care with sharp implements, and never stare into fiber optic patch cords. Always discard fiber scraps in the trash, ensuring they aren’t left on the floor or workstation.